


Old walls can drain energy from any room fast. A fresh texture can change everything you see. Refresh old walls with a pull trowel texture that offers a smooth, modern feel. This finish softens flaws and adds gentle depth. It works well for tired drywall and plaster walls. The look feels calm, clean, and current. Home updates feel easier when walls look balanced again.
Many people want updates without stress or heavy tools. Refresh old walls with pull trowel texture, and follow this guide to achieve flawless pull trowel results using simple motion and proper timing. Proper prep keeps outcomes smooth and strong, while each step builds control and confidence. You might notice better flow with practice. This approach helps avoid rough spots and patchy areas, and with patience, anyone can renew walls at home. The process feels rewarding and leaves results that last for years.
Why Pull Trowel Texture Is Perfect for Old Walls?
Old walls can look modern without full replacement. Texture creates change fast and feels rewarding. Pull trowel texture adds depth with gentle movement. It hides cracks and worn marks well. Walls feel calm instead of damaged. This finish suits drywall and plaster spaces. Rooms gain a fresh look with simple effort. The result feels clean, modern, and balanced.
Cracks, stains, and uneven spots make rooms feel tired. Light reveals flaws every day, and delays allow small issues to spread. Refresh old walls before damage grows. This guide shows how a professional pull trowel approach brings character and flow to your walls. The finish feels soft and current, with depth appearing without harsh patterns. With patience, anyone can refresh old walls at home.
What Is Pull Trowel Texture?
Pull Trowel Texture Explained
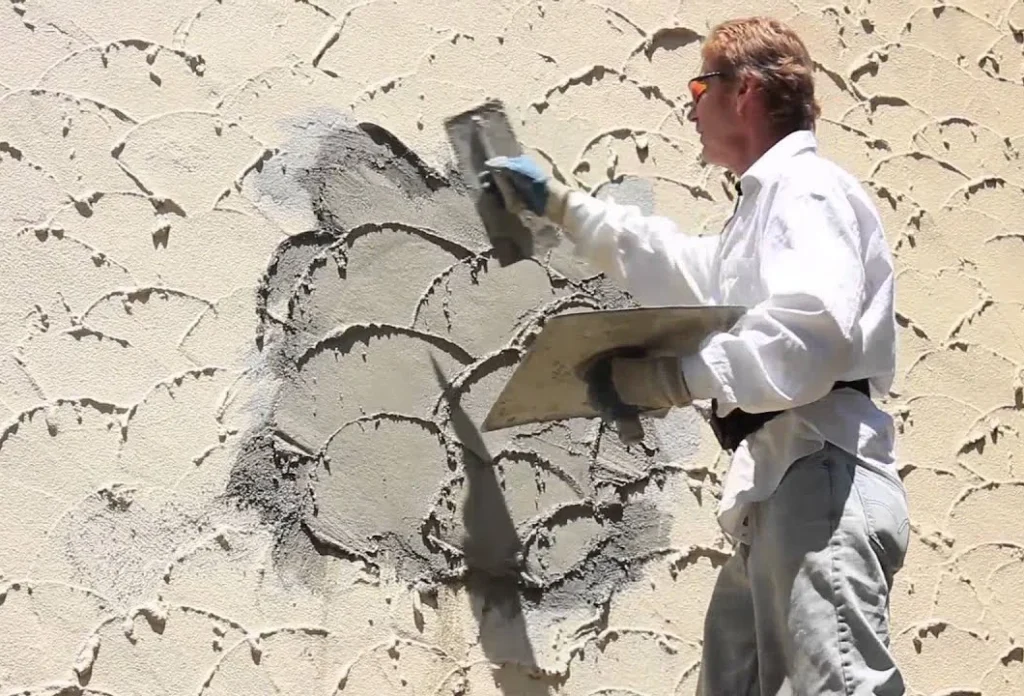
Pull trowel texture is a wall finish made by a steady pulling motion. A flat tool spreads compound across the wall. The motion creates soft flow and gentle depth. The surface feels calm and modern. This style avoids sharp peaks and harsh marks. Walls gain smooth visual movement. Old damage becomes less visible.
The finish feels clean and balanced. Light moves softly across the surface. Many rooms benefit from this quiet texture. It works well on drywall and plaster walls. Home updates feel easier with this method. Results look natural and planned.
Pull Trowel vs Skip Trowel Texture
Skip trowel texture creates deeper marks and stronger contrast. The surface feels bold and rough. Pull trowel texture stays soft and even. Depth remains controlled and low. Pattern flow looks gentle and smooth. Skip trowel texture shows more variation. Pull trowel texture fits modern spaces better. Walls feel calm and open. Many owners prefer this softer look.
When to Use Pull Trowel Texture on Walls
Pull trowel texture works best when walls show age. This method creates a calm, textured wall finish with soft depth. It hides damage without heavy repair. The surface feels smooth and modern. Light moves gently across the wall. This choice saves time and effort. Many owners use it during room updates. The finish feels planned and clean. It fits both old and newer homes well.
Common Wall Problems It Solves
Cracked drywall makes walls feel worn. Uneven surfaces catch light and show flaws. Outdated wall texture dates a room fast. Pull trowel texture covers these issues well. The compound fills low spots naturally. Old marks fade from view. This creates a fresh drywall texture finish. Walls feel balanced again. Repairs feel less stressful with this approach.

Best Rooms for Textured Wall Finishes
Living areas benefit from soft visual flow. Bedrooms feel calm and restful with texture, while hallways gain depth without bold patterns. These spaces are ideal for the best pull trowel texture, which keeps the look clean and modern. Rooms feel updated and refreshed without visual noise.
Wall Surface Preparation Before Texturing
Proper prep decides how the final wall will look. Wall surface preparation helps texture hold and flow well. Skipping this step causes weak spots later. Clean, smooth walls support even texture depth. Old damage shows less after good prep. This stage saves time during texturing. Calm prep leads to calm results. Walls feel ready and balanced before any compound touches them.
Cleaning and Repairing Old Walls
Start by removing dust and loose residue. Dirty walls block proper bond. Wipeout surfaces with a microfiber cloth. Let the walls dry fully. Fill cracks and holes with compound. Smooth repairs once dry. Flat walls help texture spread evenly. This step builds a strong base. Repairs prevent flaws from showing later.
Removing Existing Wall Texture
Heavy texture must be reduced first. remove wall texture using light sanding. Avoid deep grinding. Focus on high points only. Skim coat uneven areas gently. Let the compound set before the next steps. Smooth walls accept new texture better. This creates clean, even results.
Tools Needed for Pull Trowel Wall Texture
The right tools make wall work easier and cleaner. Wall texture techniques depend on control and smooth motion. Poor tools cause drag and rough spots. Simple tools work best for home projects. Clean tools protect texture quality. Prepare everything before starting. This avoids rushed fixes later. Good setup supports steady progress and calm results. Tool choice affects finish more than force.
Essential Texturing Tools
A pull trowel shapes the main texture pattern. It creates soft movement on the wall. A finishing trowel helps refine raised areas. It smooths edges and blends texture. A mud pan holds compound during work. It keeps material close and clean. These tools guide texture depth and flow. They form the base of controlled wall work.
Supporting Wall Finishing Tools
Sanding blocks smooth high spots after drying. Joint compound creates texture and fills flaws. Mixing tools keep the compound smooth and workable. These items support drywall finishing steps. They help correct small issues early. Together, they improve texture quality and finish control.
How to Skim Coat Walls for a Smooth Base?

Skim coating prepares walls for clean texture work. Skim coat walls create a flat and even surface, hiding small dents and old marks. Texture looks better on smooth walls, and just as a fresh finish shows how paint increases value, proper preparation enhances the overall appeal. This step improves control during texturing, and skipping it often leads to rough results. A good base saves time later, leaving walls ready and balanced before texture begins.
Why Skim Coating Matters?
An even surface supports consistent texture depth. High spots cause drag and lines. Low spots collect extra compound. Skim coating fixes these issues early. It improves texture consistency across the wall. Light reflects evenly after coating. This step supports a smooth wall finish. The final look feels calm and planned.
Skim Coat Application Basics
Apply the compound in thin layers only. Thick coats crack and sag. Use smooth passes with light pressure. Keep the blade angle low. Overlap strokes gently. Let layers dry fully before sanding. Light sanding removes ridges. This method builds a smooth wall finish ready for texture.
Step-by-Step Pull Trowel Texture Technique
Clear steps help achieve clean wall texture results. This method rewards patience and steady motion. The pull trowel technique works best with calm control. Each stage builds on the last one. Skipping steps leads to uneven texture. Focus on balance and feel during work. The goal is soft depth with natural flow. This approach suits many wall types at home.
Step 1: Applying the Base Coat
Start with a smooth base coat across the wall. Spread compound evenly using a flat blade. Keep thickness consistent across the surface. Thick areas cause drag later. Thin layers are easier to control. Watch the light reflection while spreading. Adjust pressure as needed. A clean base supports later texture work. Let the coat set slightly before texturing begins. This step prepares walls for smooth results.
Step 2: Creating Pull Trowel Texture
Begin texturing once the base feels firm. Pull the trowel toward you with steady motion. Keep the angle low and relaxed. Vary pressure gently to add depth. Avoid sharp turns or stops. Let the pattern form naturally. Wall texture techniques rely on feel, not force. Work in small sections. Step back often to review flow and balance.
Step 3: Blending and Softening Edges
Blend edges while the compound stays workable. Use overlapping strokes to avoid seams. Keep movement light and smooth. Do not press hard. Allow natural pattern flow to guide motion. Match edges with the center texture. Stop once the wall looks balanced. Overworking ruins softness. This final step brings calm and modern texture to walls.
Common Pull Trowel Texture Mistakes
Mistakes often appear when walls feel rushed. A poor drywall texture finish can spoil the room’s look, and being aware of common pull trowel mistakes helps prevent them. Many issues come from too much force or poor timing. Texture needs light, calm control, watch the surface often and stop when movement looks right. Small errors grow fast if ignored, so knowing these mistakes helps protect a clean, textured wall finish that feels modern and smooth.
Overworking the Surface
Overworking flattens texture and removes flow. Repeated passes erase movement. The wall starts to look dull. Depth fades and interest drops. This happens when trying to fix too much. Stop once balance appears. Let the compound set naturally. Soft texture needs space to hold form. Fewer passes keep life in the wall. This protects a smooth, drywall texture finish.
Uneven Pressure Issues
Uneven pressure creates harsh lines. Heavy force cuts into the compound. Light areas stay thin. The finish looks patchy. Control comes from steady hands. Keep the angle low and the motion smooth. Let the tool weight guide work. Even pressure supports a calm, textured wall finish. Practice improves feel and results.
Achieving a Modern Textured Wall Finish
A modern wall texture feels calm, clean, and balanced. Modern wall texture relies on control, not heavy patterns. The goal is soft depth with steady flow. Walls should feel updated, not busy. Light movement adds interest without noise. This style fits many homes today. It works well with clean paint tones. The finish feels fresh and planned. Good texture improves room comfort and visual ease.
Texture Depth Control
Texture depth changes how a room feels. Light texture suits small rooms well. Bold texture fits large open spaces better. Too much depth can overwhelm walls. Too little depth can look flat. Balance matters most here. Pull motion helps control texture feel. This approach supports plaster wall texture with soft movement. Always test depth on a small area first.
Matching Texture Across Walls
Consistency keeps walls looking professional. Use the same stroke direction on each wall. A change in direction shows fast under light. Keep compound thickness uniform throughout the work. Uneven thickness causes patchy results. Step back often to compare areas. Small fixes early prevent mismatch later. Uniform texture creates a calm, modern finish.
Drying, Sanding, and Final Touches
Drying time protects texture quality and wall strength. Drywall finishing steps depend on patience during this stage. Let the surface cure at a steady pace. Fast drying can cause cracks. Avoid strong airflow near walls. Natural drying keeps the texture stable. Touch the wall lightly to test firmness. Wait until the surface feels set. This step locks the texture shape and depth. Rushing here can ruin earlier work.
Proper Drying Time
Surface curing needs calm conditions. Heat and fans dry the compound too fast. Slow drying supports strength and balance. Cracks form when moisture leaves unevenly. Let walls rest without disturbance. This protects the finish and texture flow.
Light Sanding for Refinement
Sanding should stay gentle and limited. Focus only on high spots. Use light pressure and soft strokes. Do not flatten texture. Maintain texture depth during sanding. Check progress often. This step supports a smooth wall finish without loss of movement.
Conclusion
Pull trowel texture refreshes old walls without full replacement, a finish often recommended by professionals like Rockstar Painting Denver. It hides cracks, dents, and worn marks with soft movement, helping walls feel modern, calm, and balanced again. Proper preparation supports strong results, while skim coating creates an even base for texture flow. Light pressure and steady motion shape clean depth, and patience protects texture quality and visual comfort over time.
Success comes from following each step with care. Preparation, skim coating, and technique work together. Each stage builds control and confidence. The finish feels smooth and current. Rooms gain depth without a heavy pattern. Results last through daily use. Use this pull trowel texture guide to refresh old walls and create a clean, modern textured wall finish with lasting visual impact.
FAQs
Pull trowel texture refreshes old walls with soft movement and depth. It creates a smooth, modern look. This method hides wear and adds visual balance. Refresh Old Walls with Pull Trowel Texture without heavy repairs.
Pull trowel texture and skip trowel texture look similar but feel different. Pull trowel stays softer and more even. Skip trowel shows deeper marks and bolder contrast.
Yes, skim coating helps the texture stay even. It removes high spots and fills low areas. A smooth base improves control and final appearance during wall texturing work.
Yes, pull trowel texture disguises cracks, dents, and uneven surfaces. The soft pattern breaks light reflection. Old wall flaws become less visible after proper preparation.
Wall texture finishing needs a pull trowel and a finishing trowel. Joint compound builds texture. Sanding tools help refine the surface after drying.