


Why Drywall Repair Matters
Walls take hits from daily life. Small cracks or dents grow fast and make rooms look dull. These marks show stress in the wall and can point to deeper issues. A weak spot can spread and turn into a larger task. You might notice soft areas after a leak. You might see holes from sharp bumps. These signs tell you that the wall needs care now. Acting early keeps the wall strong and neat.
Simple steps fix most marks. You clean the area and fill the gap. You sand the spot and check the shape. Each small fix helps keep the wall firm. Patchwork also stops water from moving deeper. This saves time and stress later. Fixing one mark today can stop ten marks next year. It also brings back a clean look in each room.
Good care brings your walls back to life. Smooth surfaces make paint appear brighter, and freshly repaired walls help the space feel calm and welcoming. A tidy room creates a warm, comfortable mood. Timely repairs also save money in the long run. Proper attention ensures your home stays neat and strong exactly what to expect from professional drywall repair.
Common Drywall Damages and Their Impact
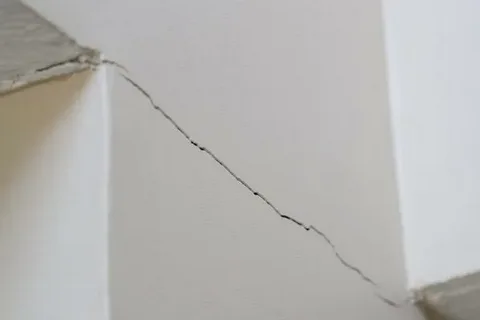
Cracks appear on walls or ceilings and spread fast when ignored. They form from stress or movement and can weaken the surface. Early drywall damage repair keeps these cracks from growing and saves the wall from deeper issues. Cracks also make rooms feel worn and dull.
Holes form from nails or sharp hits from furniture or small accidents. Large holes draw attention and make the space look rough. Dents also appear from impacts and leave clear marks on the surface. Each mark lowers the look of the room. Quick fixes prevent more harm and keep walls strong.
Water spots lead to soft areas and weak surfaces. Uneven sections grow from settling or poor work. These flaws ruin the smooth finish of the wall. Timely wall repair restores a clean shape and stops further wear. Strong walls keep the home neat and calm.
Preparing Walls for Drywall Repair
Clean the Area
Start with a clean wall so each step works well. Brush away dust and loose bits. This helps new material stick with ease. A clean base gives you a strong start when doing drywall patching. It also helps you see each flaw with more clarity.
Sand Rough Spots
Rough spots stop smooth work. Use light sanding to level the surface. This creates a firm base for patchwork. You might notice the wall feels flat after light sanding. A smooth face makes each layer blend with ease.
Remove Loose Drywall
Loose pieces lead to future issues. Pull away weak parts to avoid later fail. This step is key when repairing damaged walls. Strong edges hold the new compound well and keep the patch firm. Clean edges also help you form a neat shape.
Dry Water Spots
Water kills weak spots fast. Make sure each wet area is fully dry. Dry spots help the patchwork bond with strength. This step stops soft areas from growing. Drywall feels solid and takes new layers with ease.
Step-by-Step Drywall Repair Techniques
Assess Damage Size
Look at the wall and check the harm. Small marks need light work. Large holes need full care. Study the shape and depth with calm focus. This helps you plan each move with care. Clear checks guide you as you use drywall repair techniques with skill. Strong checks help you act with less stress and more ease.
Cut Out Damaged Drywall
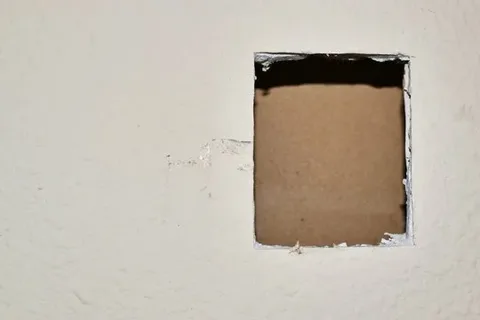
Weak parts must go for a firm base. Cut the bad area with slow moves. Keep each edge neat and solid. A clean cut gives your patch a strong grip. This stops loose spots from returning. Careful cuts help the wall hold new work with power.
Apply Patching Material
Now fill the open area with a fresh mix. Use light, steady moves to spread the compound. Make sure the gap is fully packed and even. Don’t rush this stage. Smooth fills are key when fixing wall flaws before painting, helping you achieve strong, lasting results. Each layer builds a firm shape that holds over time.
Smooth the Surface
Press the mix with a putty tool or trowel. Light strokes shape a flat face. You might see the patch melt into the wall. A smooth base makes paint work look clean. This step sets the tone for the final look.
Dry and Sand
Let the area dry with no rush. A dry patch stands firm. Sand the spot with calm moves. Light sanding keeps the shape neat. The goal is a smooth face that blends with ease. This step adds a soft touch to the work.
Prime and Paint
Prime the patch to seal the area. Paint the wall to match the room. Soft strokes help the patch blend with ease. The wall feels fresh and clean after being paint. Good work brings the space back to life.
Repairing Cracks and Holes in Walls
Fill Hairline Cracks
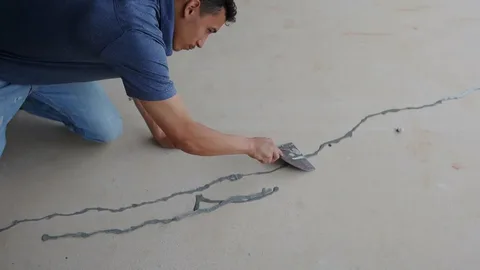
Hairline lines form on weak spots. You can fix them with a joint mix. Spread a small amount over the line. Press the mix deep into the gap. Light strokes help shape a neat face. This step helps with repairing drywall cracks in a safe and calm way. Thin layers form a strong bond.
Patch Small Holes
Small gaps form from nails or sharp bumps. Clean the spot first. Add a small patch or mesh if the hole feels wide. Cover the patch with a fresh mix in light moves. Let each coat set well. Light sand work helps blend the shape. This keeps the wall firm and clean.
Fix Large Holes
Large gaps need more care. Cut the weak part out with slow moves. Add a strong patch to the open space. Fill the shape with joint mix in thin layers. Each layer must dry well. Slow hands give you a solid base. This step helps with fixing wall holes that feel deep.
Apply Thin Coats
Thin coats dry fast and hold firm. Thick coats sag and break. Use soft strokes with your tool. Spread the mix flat on the wall. You might see the face look even after each step. Light work gives clean results and a strong finish.
Feather the Edges
Now blend the patch with the wall. Use long, soft strokes to fade the edge. The goal is a smooth face with no sharp lines. Feathering helps the patch vanish in plain sight. This step sets the base for clean paint later.
Final Touch
Let the wall dry with no rush. Sand with light care to smooth the area. Prime the patch to seal the face. Paint the surface to match the room. The wall now looks fresh and firm again.
Drywall Patching Mistakes to Avoid
Using the Wrong Compound
Many people choose the wrong compound for the job. Each type has a specific purpose: light mix works best for small gaps, while heavy mix is suited for larger repairs. Using the wrong one can lead to weak spots and cracks. Making the right choice helps you avoid common mistakes and ensures a smooth, lasting finish just like professional drywall repair.
Skipping Sanding
Some skip sanding due to time or stress. This creates a rough face. Sanding shapes the area and clears bumps. Light sanding keeps each layer flat. A smooth base holds paint well. Skipping this step ruins the final look.
Thick Layers of Compound
Thick coats cause sag and peel. They also take longer to dry. Thin coats dry fast and form a firm hold. You get a neat shape with light work. Slow and thin steps give the best mix of strength and style.
Painting Too Soon
Fresh mix needs time to dry. Paint on wet mix traps moisture. This leads to cracks and dull spots. A dry face takes paint well. Slow timing gives you a clean and bright finish.
Ignoring Feathering
Hard edges stand out on flat walls. Feathering blends the patch with soft strokes. It fades the edge and hides the fix. This step helps the patch vanish with ease. Many people skip it and then see clear lines. Feathering keeps the wall smooth and calm.
Smoothing and Finishing for a Perfect Wall
Sand Patched Areas
Smooth walls start with calm sanding. Light strokes clear high spots and bumps. This step shapes a flat face that feels neat. Sanding also helps each layer bond with care. You see the patch fade as the wall evens out. This helps a lot with smoothing wall surfaces in a clean and calm way.
Apply Primer
Primer locks the patch and sets a firm base. It hides small marks left by sanding. Primer also helps paint stay bright and even. A primed face keeps moisture out and gives the wall a fresh start. Skipping primer leads to dull paint and weak spots.
Match the Paint
Pick paint that fits the rest of the room. A close match keeps the wall neat. Test a small spot first to check shade and tone. Light coats work best for a clean look. A good match helps the patch blend well with the space.
Blend the Texture
Some walls have light or deep texture. You need to match this shape for a clean face. Soft strokes help form a close look. A matched texture makes the patch vanish from sight. This step supports strong drywall finishing repair for a smooth result.
Quick Comparison: Common Drywall Problems and Solutions
Small Holes
Small marks come from nails or sharp bumps from daily life. These gaps look simple, but still need care. Clean the area first. Add a small amount of mix or spackle. Let it dry and sand with light strokes. This gives a neat shape. This step helps with small drywall hole repair in a calm and clear way. A quick paint coat brings back a fresh look.
Large Holes
Large gaps form from door hits or water damage. These spots need a strong patch. Cut the weak part out with slow moves. Fit a new piece of board in the space. Add joint mix in thin coats. Let each coat set well. Sand the face to blend the patch. Paint later to match the room. This fix brings back strength and shape.
Hairline Cracks
Tiny lines show stress or slow wall shift. Many people fear these marks, but they fix with ease. Fill the line with joint mix. Press the mix deep into the gap. Feather the edge with soft strokes. This helps with smooth blends. These moves follow good wall crack repair tips and make the mark vanish.
Uneven Surfaces
Rough spots come from fast sanding or thick coats. Light sanding clears bumps and high areas. A flat base takes paint well. Sand slow and check often. This keeps the wall neat and calm.
Water Harm
Leaks cause soft spots and stains. Cut out weak parts for a strong base. Patch the area with fresh board and mix. Let the wall dry well. Paint later for a clean look. This keeps your space firm and fresh.
Conclusion
Timely care keeps your walls neat and strong. Small marks grow fast when ignored. Early drywall repair stops this and brings back a clean look. Walls feel fresh when cracks and holes are fixed with calm steps. Each repair helps the room feel bright and well-kept. You might notice the space gain a warm charm after simple work.
Good work also keeps stress at bay. Simple tools can handle most issues with ease. Light sanding and thin coats create a smooth, even surface. These steps prevent weak spots from spreading. Careful techniques guide you when repairing damaged walls in any room. Even small dents pose less risk once patched. Each repair adds lasting strength, just the kind of quality Rockstar Painting Denver delivers on every project.
Basic wall repair also saves time and cost. Clean walls take paint well and last longer. Fresh walls lift the mood and shape of the home. A tidy surface makes each room feel calm. Short tasks done today help you avoid larger jobs later.
Ready to restore your walls? Follow these expert drywall repair tips today and bring beauty back to your home.
FAQs
Clean the spot first. Add a light coat of mix. Let it dry. Sand the area with soft strokes. Repeat thin coats if needed. These steps help with patching drywall effectively in a quick and safe way.
Yes, you can fix them with care. Fill the gap with a joint mix. Press the mix deep into the line. These moves help with repairing drywall cracks in most homes. Call a pro if the crack feels wide or deep.
Dry time shifts by room heat and air flow. Thin coats dry fast. Thick coats need more time. Touch the spot to check the feel. Dry areas feel firm and smooth.
Joint mix works for most tasks. Mesh patches help with wide holes. A putty tool shapes the face. Sand blocks smooth the area. These tools guide you through safe drywall repair techniques.
Yes, clean walls feel bright and neat. Fixing dents removes weak spots. Smooth work helps paint last longer. Clean walls lift the look of each room.